
Bucking Unit Acceptance Checklist: FAT, Commissioning & First-Job Sign-Off
A practical bucking unit buyer checklist covering FAT, report export, safety checks, commissioning, operator handover, and first production joint sign-off.
Galip Equipment — a practical buyer acceptance checklist for workshop managers, QA/QC leads, service companies, and procurement teams preparing to purchase a hydraulic bucking unit.
A hydraulic bucking unit buyer usually checks the big numbers first — OD range, torque range, power requirement, delivery time, and price. Those numbers are necessary, but they are not enough. The bucking unit acceptance checklist below is what supervisors actually use to confirm a unit before final payment, shipping, commissioning, and the first production joint.
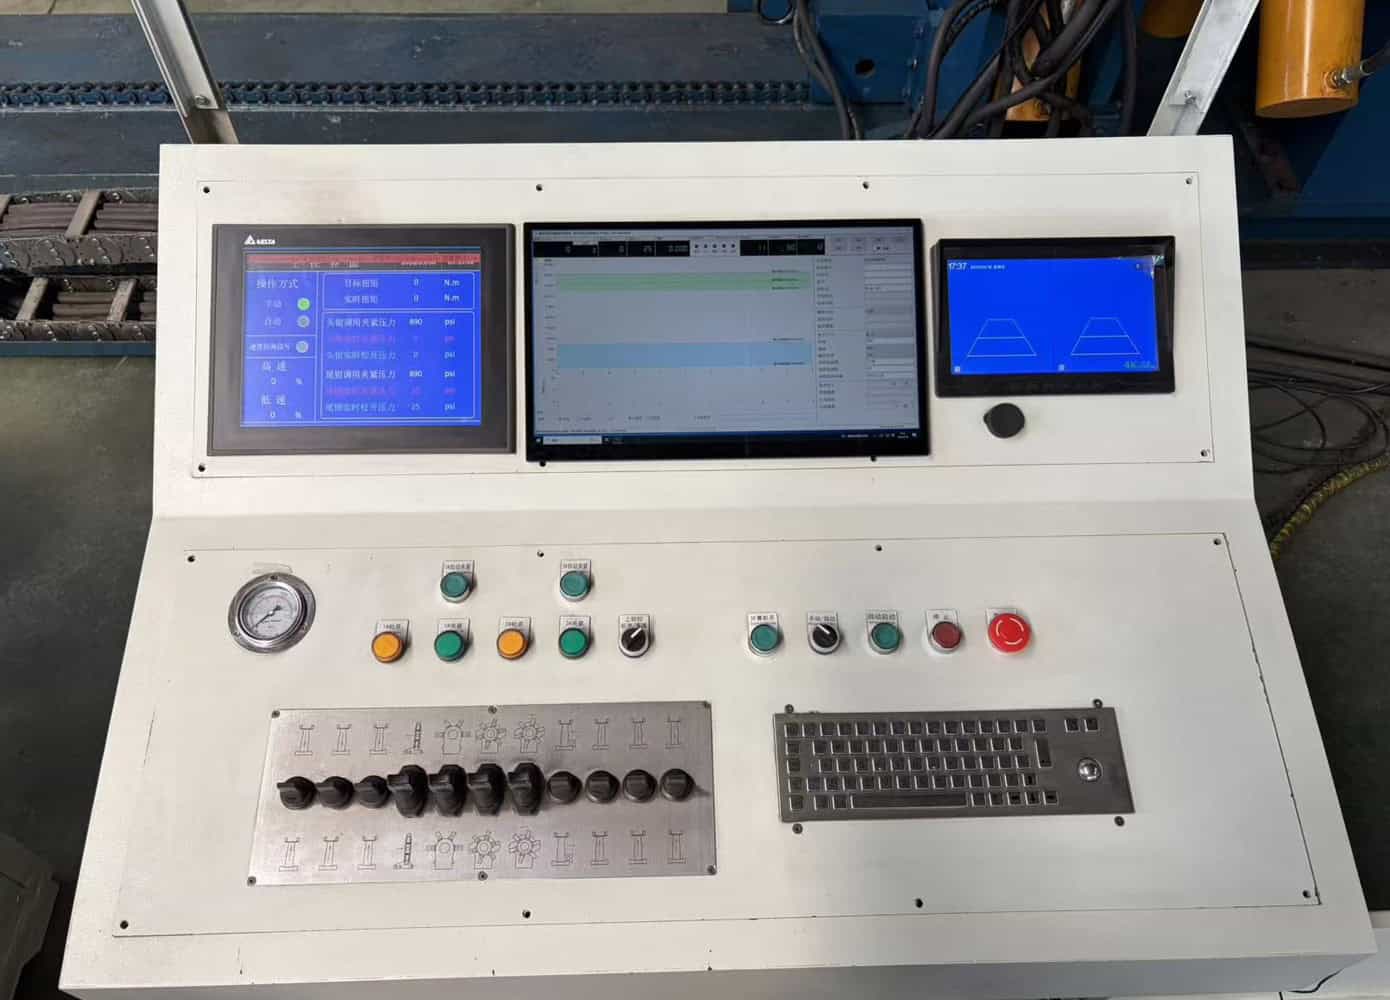
Figure 1. Galip bucking unit control console. Use real factory and commissioning photos like this to make the acceptance evidence experience-based, not generic.
This checklist is written for buyers using the unit in real workshop environments — OCTG service centers, casing and tubing yards, mud-motor repair shops, downhole tool service operations, and integrated service contracts. It is not a replacement for the connection owner’s official make-up procedure, your site safety plan, or Galip’s project-specific manual. It does describe the practical sign-off discipline that buyers across these environments consistently use.
For buyers still defining the machine envelope before this acceptance step, review our bucking unit selection guide and spec sheet reading guide first.
Table of contents
- 1. Before the purchase order: define the real job envelope
- 2. Factory acceptance test: what the buyer should witness
- 3. Report acceptance: the file must be useful after the shift ends
- 4. What should be in the handover package
- 5. Site commissioning: do not skip the boring checks
- 6. The first production joint as a controlled handover
- 7. What buyers should review after the first 10 jobs
- 8. Common buyer mistakes during acceptance
- FAQ — bucking unit acceptance checklist
1. Bucking unit acceptance checklist starts before the purchase order
The most expensive bucking unit acceptance checklist problems usually start before the machine is built. If the RFQ only says “we need a bucking unit for casing” or “a torque machine for general workshop use,” the manufacturer is forced to guess at the workpiece, support layout, control depth, and reporting needs. The bucking unit acceptance checklist therefore begins not at FAT but at the buyer’s own definition of work.
Before purchase order approval, define the job envelope in plain workshop language. What products will be handled? What is the real OD and length envelope? What level of QA records is expected? Who will operate the unit, and what level of training is realistic? Answering these questions clearly turns the RFQ from a vague catalog request into a precise build specification.
This information is not paperwork. It tells the manufacturer how the unit should be configured, what accessories may be required, and what type of operator interface and documentation will fit your team. It also gives both sides a shared reference for later acceptance decisions.
| Buyer question | Why it matters | What to provide to supplier |
|---|---|---|
| What products will run on the unit? | Different products may need different support, jaw, and handling practices. | Casing, tubing, drill pipe, mud motor, jar, BHA component, tool repair, or mixed service. |
| What is the OD and length envelope? | The support layout must match the real workpiece, not only the catalog size. | Minimum/maximum OD, typical length, and any heavy or short components. |
| What records are required? | QA requirements affect the control-console workflow and export format. | Report format, job fields, joint ID needs, witness-review expectations. |
| Who will operate it? | Training style changes if operators are new to torque-turn records. | Operator experience level, shifts, language needs, maintenance owner. |
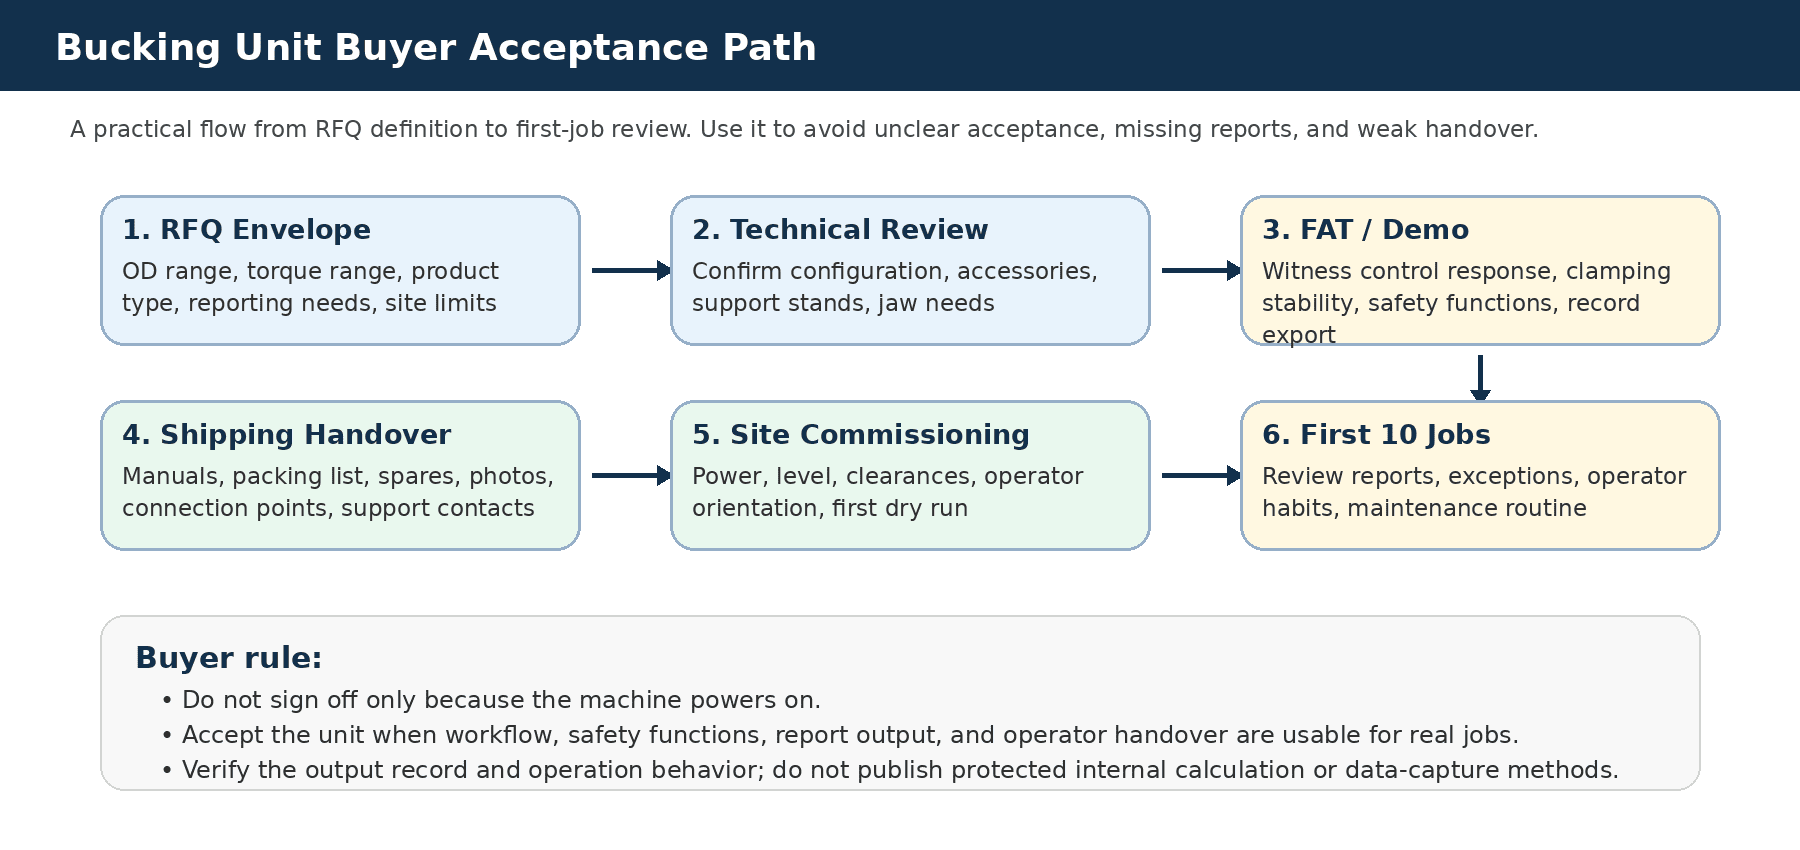
Figure 2. A practical bucking unit buyer acceptance path from RFQ definition to first-job review. Use it to avoid unclear acceptance, missing reports, and weak handover.
2. The FAT step of the bucking unit acceptance checklist
A factory acceptance test (FAT) should not be treated as a short power-on video. The buyer — or the buyer’s nominated technical witness — should observe a controlled demonstration that follows the same operational steps the workshop will use later. Anything that is hidden from the FAT will need to be debugged on site at higher cost and lower patience.
A strong FAT normally includes: machine identification (model, serial, configuration, accessories), visual inspection, manual movement checks (travel, clamping, support, rotation, reset), a controlled make-up or break-out demonstration at safe test conditions, real-time review of the torque-turn capture, report saving and export in the agreed format, and a walkthrough of the safety functions, labels, and emergency stop behavior.
Ask for evidence of the work involved: photos, video clips, screenshots, sample reports with test data, and a signed checklist. Do not rely on memory. The point of the FAT is to convert “the machine works” into defendable evidence that the machine works the way your shop will use it — and that’s the difference between catalog acceptance and operational acceptance. Operators who later read the curves rely on the same discipline described in our torque-turn graph interpretation guide.
| FAT item | What to check | Pass evidence | Hold point |
|---|---|---|---|
| Machine identity | Model, serial number, configuration, major accessories, control cabinet, power unit. | Nameplate/photo record and packing list draft. | Identity is unclear or accessories are not listed. |
| Mechanical movement | Travel, clamp movement, support movement, rotation, and reset behavior. | Video of smooth movement and operator sequence. | Unexpected motion, repeated faults, or unclear control labeling. |
| Clamping and support | Workpiece is centered, supported, and held without visible slip during demonstration. | Photo/video of setup and clamp areas after test. | Buyer’s real OD range not represented in test setup. |
| Controlled operation | Make-up or break-out operation follows the expected sequence at safe test conditions. | Demo video and operator notes. | Operation works only with repeated manual corrections. |
| Record and export | Job record is saved and exported in agreed file format. | PDF/Excel sample with test data and job fields. | Report cannot be found, exported, or matched to the test job. |
| Safety and handover | Emergency stop, guards, labels, and operator warnings reviewed. | Signed safety demonstration checklist. | Safety function missing, unclear, or not demonstrated. |
3. Report acceptance: the file must be useful after the shift ends
A torque-turn record on a bucking unit acceptance checklist is valuable only if the buyer can find it, open it, understand it, and match it to the job. During acceptance, the buyer should verify the full record loop — not just confirm that “a file is generated.”
A practical acceptance test is simple. Run a test job. Save the record. Export the report. Open the exported file on a normal office computer (no special viewer). Match the report to the test joint or job reference. Make sure the values are in expected units, the curve is viewable, and the file name supports later retrieval. If any of those steps cannot be done in front of the witnesses, the report workflow is not ready.
You do not need to publish or request confidential engineering details. For buyer education and acceptance, it is enough to say the system records the make-up event, displays a curve, and exports a report a non-technical reader can open. The QA-side discipline that flows from this is covered in our premium connection make-up QA acceptance criteria reference.
| Report field | Why buyer should check it | Acceptance question |
|---|---|---|
| Job or test reference | Prevents report confusion when several tests happen in one day. | Can we match this report to the exact FAT test? |
| Workpiece / connection description | Helps QA understand what was tested. | Is the report tied to the right product category? |
| Target and final values | Shows whether the operation met the agreed setup. | Are values readable and in expected units? |
| Curve display | Allows later review of the make-up path, not only the final number. | Can the curve be viewed without special explanation? |
| Export format | Makes the record usable by QA, customers, and auditors. | Can we open the file on a normal office computer? |
| File naming and storage | Prevents lost records after several shifts. | Can operators find the previous job record quickly? |
4. What should be in the handover package
A good handover package reduces the risk of expensive support calls during the first week and is the most overlooked step in any bucking unit acceptance checklist. The buyer should confirm the package before the unit ships — not on the day it arrives. Missing manuals or undefined spare parts almost always slow down the first week of production.
Agree with the supplier on which spares belong in the commissioning kit and which belong in first-year stock, because that split decides what the shop can put right itself during the first month.
Photographs work better as a named list than as whatever the factory chooses to send, so agree in advance which photographs to ask for before the machine is wrapped.
The exact package depends on the project, destination, and Galip’s agreed scope. As a buyer checklist, the following items are usually worth confirming explicitly. The mechanical reasoning behind why this discipline matters is summarized in our Bucking Unit 101 guide for new teams.
| Handover item | What buyer needs | Why it matters |
|---|---|---|
| Operation manual | Startup, shutdown, manual/automatic operation, safety warnings. | Operators need a consistent procedure from day one. |
| Maintenance schedule | Daily, weekly, and periodic checks with responsible owner. | A new machine should not wait for the first failure before maintenance is assigned. |
| Spare parts list | Wear parts, consumables, recommended starter kit. | Reduces downtime if a normal wear item is damaged or misplaced. |
| Packing list | Main components, accessories, tools, loose items, and quantities. | Helps receiving team check shipment completeness. |
| Electrical / hydraulic support info | Allowed level of maintenance documentation under the project scope. | Helps site maintenance communicate clearly with Galip support. |
| Training checklist | Operator orientation topics and sign-off names. | Creates accountability before the first production job. |
| Sample report | An anonymized or test report showing output format. | Lets QA approve the record format before production use. |
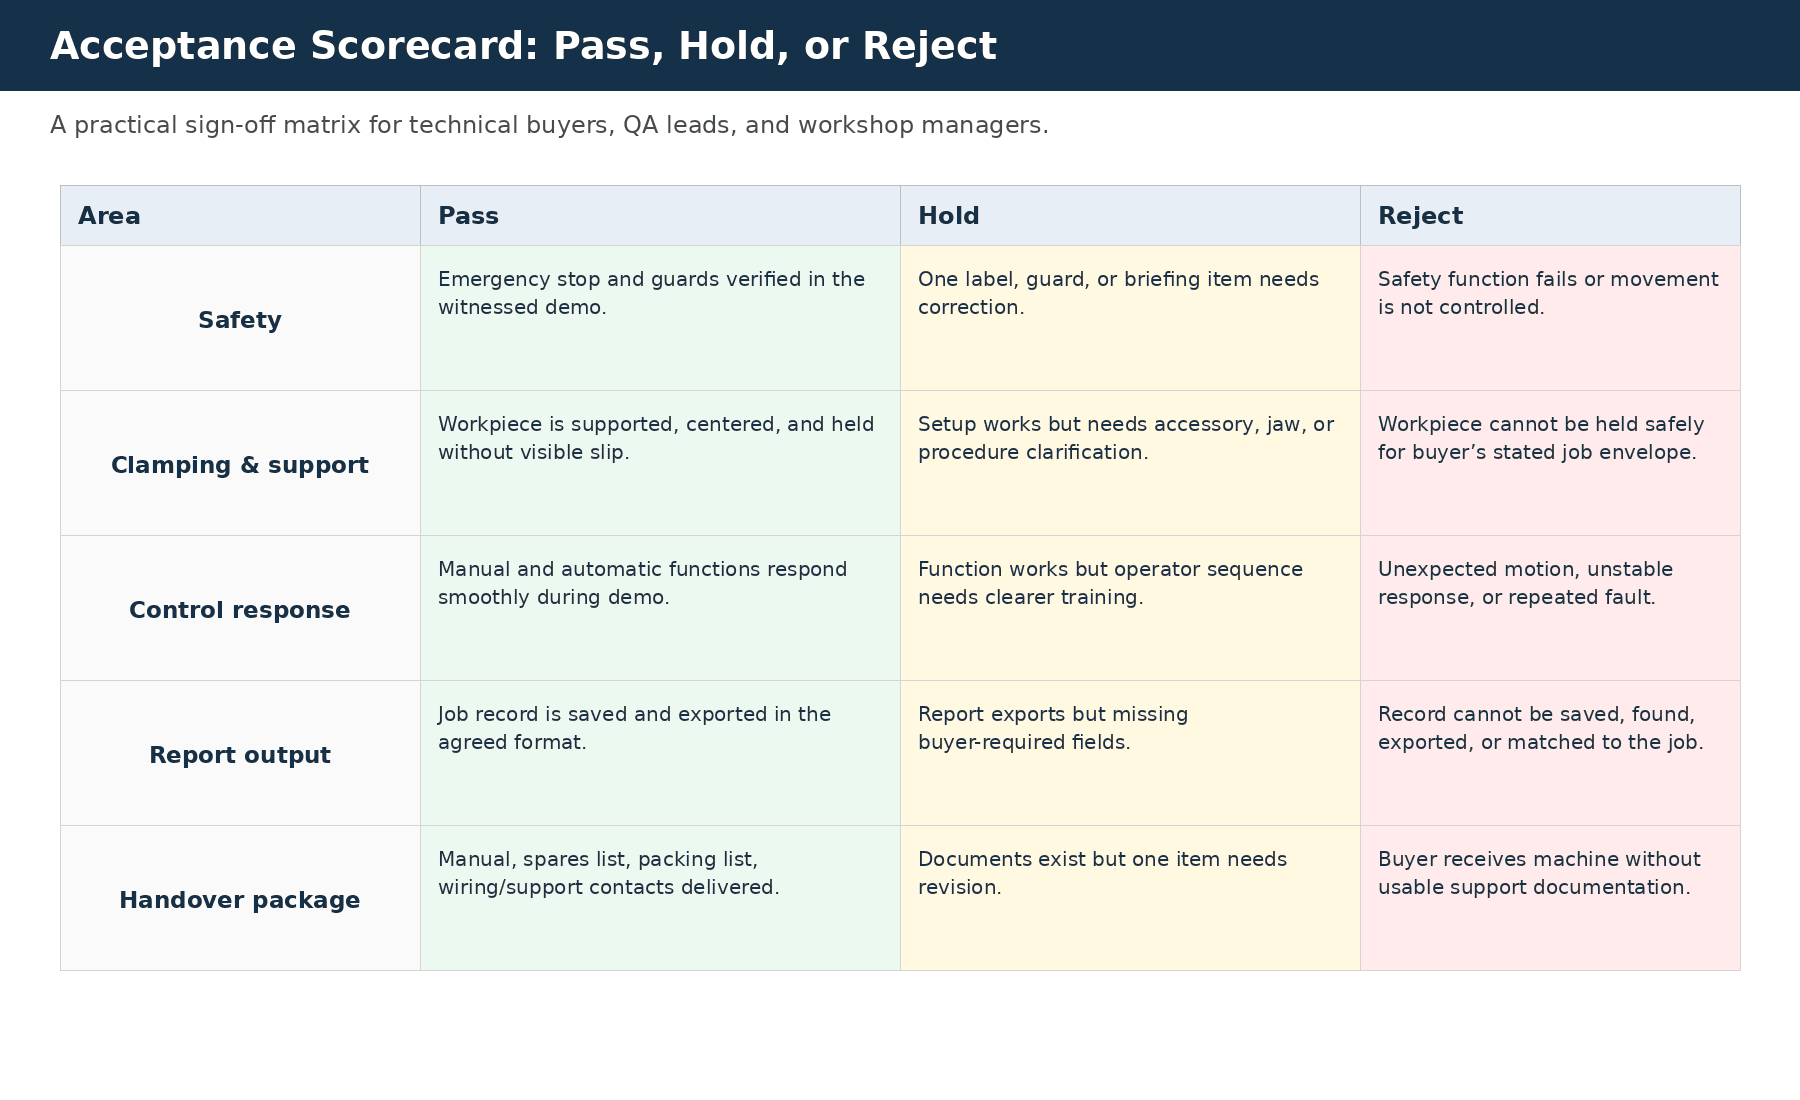
Figure 3. Simple acceptance scorecard for buyer sign-off decisions: every area is rated Pass, Hold, or Reject — and Reject means the unit is not accepted until that area is fixed.
5. Site commissioning: do not skip the boring checks
Commissioning is the stage of a bucking unit acceptance checklist where many small issues appear. The unit may have passed FAT, but the site environment is different: power supply, floor condition, hydraulic temperature, lighting, available space, and team familiarity all change the picture. Acceptance at the supplier’s facility never substitutes for commissioning on the operator’s floor — the unit needs to perform here, not in a tested test cell.
Before the first production joint, the site team should confirm foundation or floor condition, clear access around the machine, power supply stability, hydraulic startup behavior, support stand setup, basic safety verification with the first crew, and a calm dry run with no production pressure.
The first dry run should happen with operators practicing the sequence slowly: power on, check neutral position, perform manual movement, run a clean test movement, save and export a test record, perform planned emergency stop and reset, and review with supervisor. Once that sequence is repeatable, the floor is ready for real work. The supporting daily operator habits are documented in our bucking unit operation procedure guide.
| Commissioning check | Pass | Hold | Do not proceed |
|---|---|---|---|
| Power and hydraulic startup | Stable startup, no abnormal noise or leaks. | Minor label or briefing issue. | Leak, unsafe noise, electrical fault, or uncontrolled movement. |
| Operator sequence | Operator can run basic movements in correct order. | Operator needs additional supervised practice. | Operator cannot identify stop/reset/record steps. |
| Workpiece support | Support setup keeps the workpiece centered and stable. | Accessory position needs adjustment. | Workpiece cannot be supported safely. |
| Record workflow | Test record is saved, exported, opened, and named correctly. | Report works but naming rule needs correction. | Record is lost, wrong, or unusable for QA. |
6. The first production joint should be treated as a controlled handover
On a bucking unit acceptance checklist, the first production joint is not just another job. It is the moment where the buyer confirms that the machine, operator, procedure, reporting, and supervisor are working together. If this first joint is treated as ordinary production, missing controls become production habits — and undoing those habits is much harder than building them right from the first job.
Before the first production joint, the supervisor should confirm the approved connection procedure, correct tooling and jaws, support position for the workpiece, neutral console parameters, an operator briefing, witness presence (if required), and an open record file with the correct job ID.
After the first joint, stop and review the record. Do not immediately run the next piece just because the final value looks acceptable. Confirm the curve shape, exception notes, and saved file name. If any of those three need explanation, fix the process before the second joint.
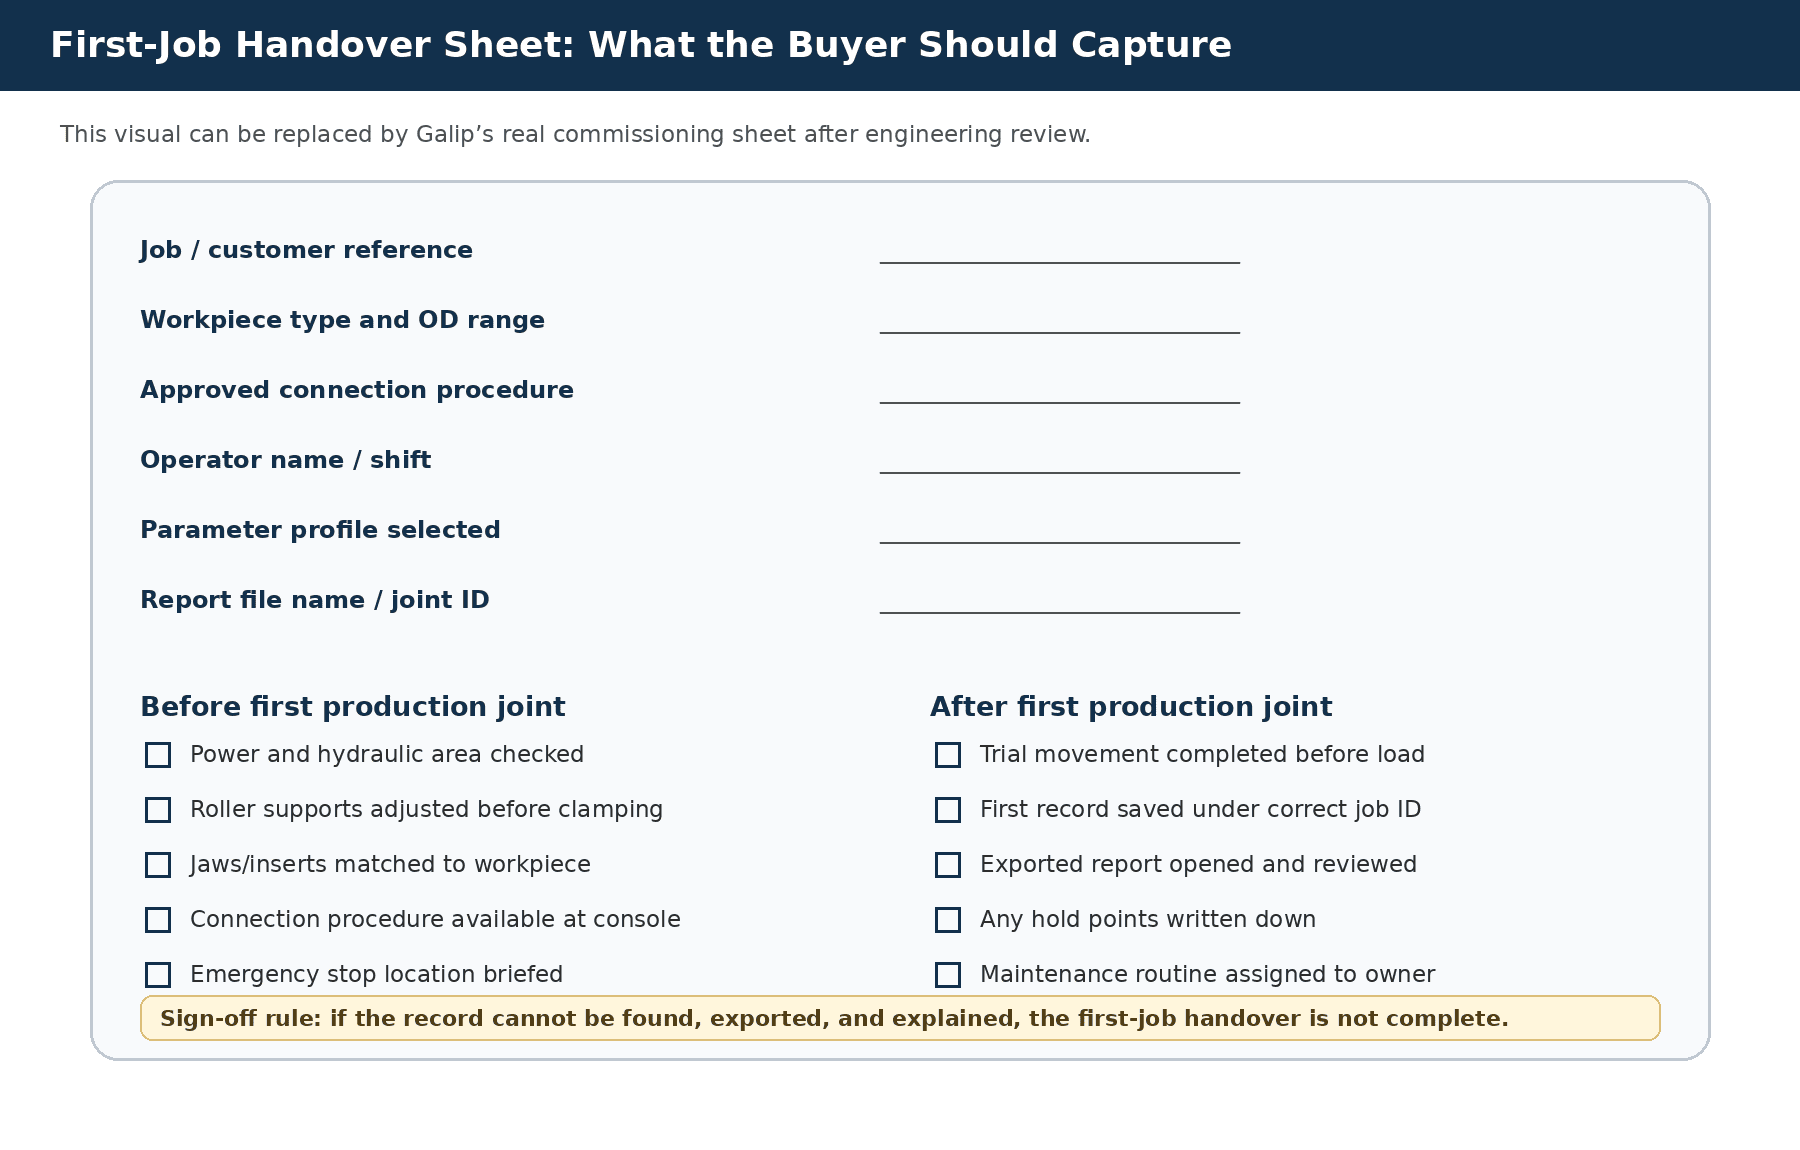
Figure 4. First-job handover sheet concept. Replace with a real Galip sheet after engineering review — the structure is what matters, not the exact form fields.
7. What buyers should review after the first 10 jobs
The first ten jobs tell the truth about a new bucking unit installation. One successful demonstration is useful; ten real jobs reveal operator habits, report storage practice, maintenance discipline, and supervisor confidence. Buyers who skip this review usually discover preventable problems three to six months later — when the production schedule no longer leaves room to fix them.
After the first ten jobs, the buyer should review the saved reports, exception notes, operator questions, average setup time, any clamp marks or surface concerns on the workpieces, daily maintenance log compliance, and the supervisor’s confidence in the workflow. Patterns at this stage point directly to where small adjustments (jaw choice, support position, operator briefing, report naming rule) will compound into stable production.
A good supplier-buyer relationship does not end at delivery. The best result is a stable workflow where operators know what to do, supervisors trust the reports, and customers receive consistent records.
| After first 10 jobs, ask this | What the answer reveals |
|---|---|
| Can we find every report quickly? | Shows whether job naming and storage rules are working. |
| Do operators follow the same setup sequence? | Shows whether training has become routine or is still dependent on one person. |
| Were any jobs stopped, repeated, or questioned? | Identifies early issues before they become customer disputes. |
| Are there visible handling or clamp-mark concerns? | Shows whether support, jaw choice, and clamp discipline need adjustment. |
| Is daily maintenance being recorded? | Confirms whether the owner of maintenance has been assigned. |
8. Common mistakes that break a bucking unit acceptance checklist
The following mistakes appear simple, but they are common because the buyer is often trying to move quickly from purchase to production. Each one represents an acceptance step that was skipped or under-specified, and each one leads to predictable downstream cost.
| Mistake | Why it causes trouble | Better approach |
|---|---|---|
| Only checking maximum torque | Maximum torque does not prove the daily workflow is stable. | Check the whole operation sequence and report output — see drive structure comparison for why torque alone is not enough. |
| Skipping report export during FAT | A saved record is useless if the buyer cannot open and understand it. | Export and open the report before shipment. |
| No first-job naming rule | Reports become difficult to match to joints or customers later. | Define file naming before commissioning. |
| Training only one operator | Knowledge disappears when that person is absent. | Train at least one backup operator and one supervisor. |
| No hold-point rule | Operators may continue after abnormal movement or unclear record. | Define what requires stop, review, and supervisor sign-off. |
FAQ — bucking unit acceptance checklist
Is a bucking unit FAT the same as final acceptance?
No. FAT confirms the unit performs the agreed demonstration at the supplier’s facility. Final acceptance should also include receiving inspection on site, commissioning, the first dry run, the first production joint review, and the first 10-job pattern review. Each step verifies a different layer of the same workflow.
Should the buyer ask how the machine captures torque-turn data internally?
No. The buyer should verify the usability of the output record, report export, and workflow. Proprietary measurement details, formulas, mechanical geometry, and internal architecture are the supplier’s engineering scope — and most reputable suppliers will not (and should not) publish them. What matters is that the report is defendable, repeatable, and openable.
What is the most important thing to test before shipment?
Beyond basic mechanical operation, the buyer should test the complete record workflow: create a test job, save the record, export the report, open the file on a normal office computer, and match the file to the test joint. If this loop is broken at any step, the unit is not ready to ship.
Can this checklist replace the connection manufacturer’s make-up procedure?
No. It is a buyer acceptance and commissioning checklist. Connection make-up values, acceptance limits, compound requirements, and rejection criteria must always follow the connection owner’s current procedure and your customer’s specification. The bucking unit acceptance checklist is about machine and workflow readiness — not connection acceptance.
Why is this article useful for buyers?
It gives procurement and workshop teams a practical sign-off method. Instead of buying only by torque range and price, the buyer can evaluate readiness at every stage — purchase order, FAT, report acceptance, handover, commissioning, first production joint, and first 10-job review. That structure converts “we received the machine” into “the machine is producing defendable work.”
Talk to GALIP about your bucking unit acceptance program
Need a hydraulic bucking unit configuration that fits your real workshop envelope? Send GALIP your product type, OD range, torque range, reporting needs, and site layout. The engineering team will recommend a configuration that is honest about what the machine does, how the report works, and what acceptance evidence will be provided — so your FAT, commissioning, and first-job sign-off are not a guessing game.
Expert Consultation
Need more information on optimizing your equipment performance? Our engineering team is available for technical consultations.
Request a Quote
Tell us about your requirements and our engineering team will prepare a detailed proposal with specifications, pricing, and delivery timeline.
