
Bucking Unit Pipe Loading: Crane, Support, Alignment, and Operator Flow
Bucking unit pipe loading guide for overhead crane handling, roller support setup, connection approach, operator flow, and QA records before make-up.
Bucking unit pipe loading is where many make-up jobs quietly succeed or fail before the torque program even starts. The connection may look ready, the unit may be capable, and the report system may be prepared, but if the pipe arrives with swing, poor support, or a rushed approach angle, the operator starts the job by fighting the setup instead of controlling the make-up.
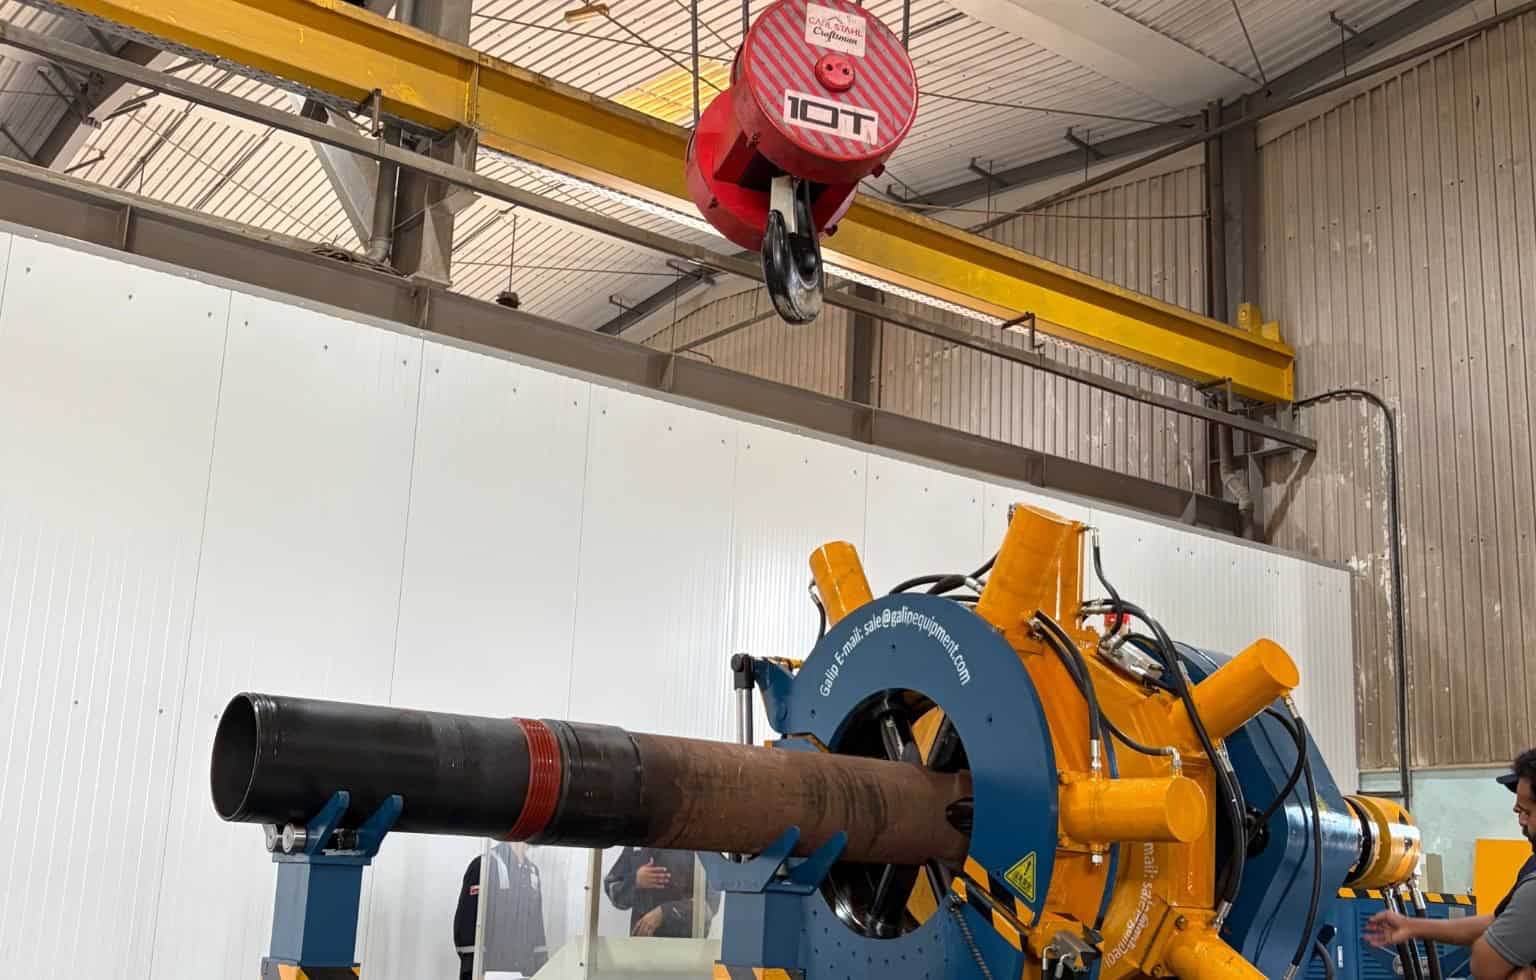
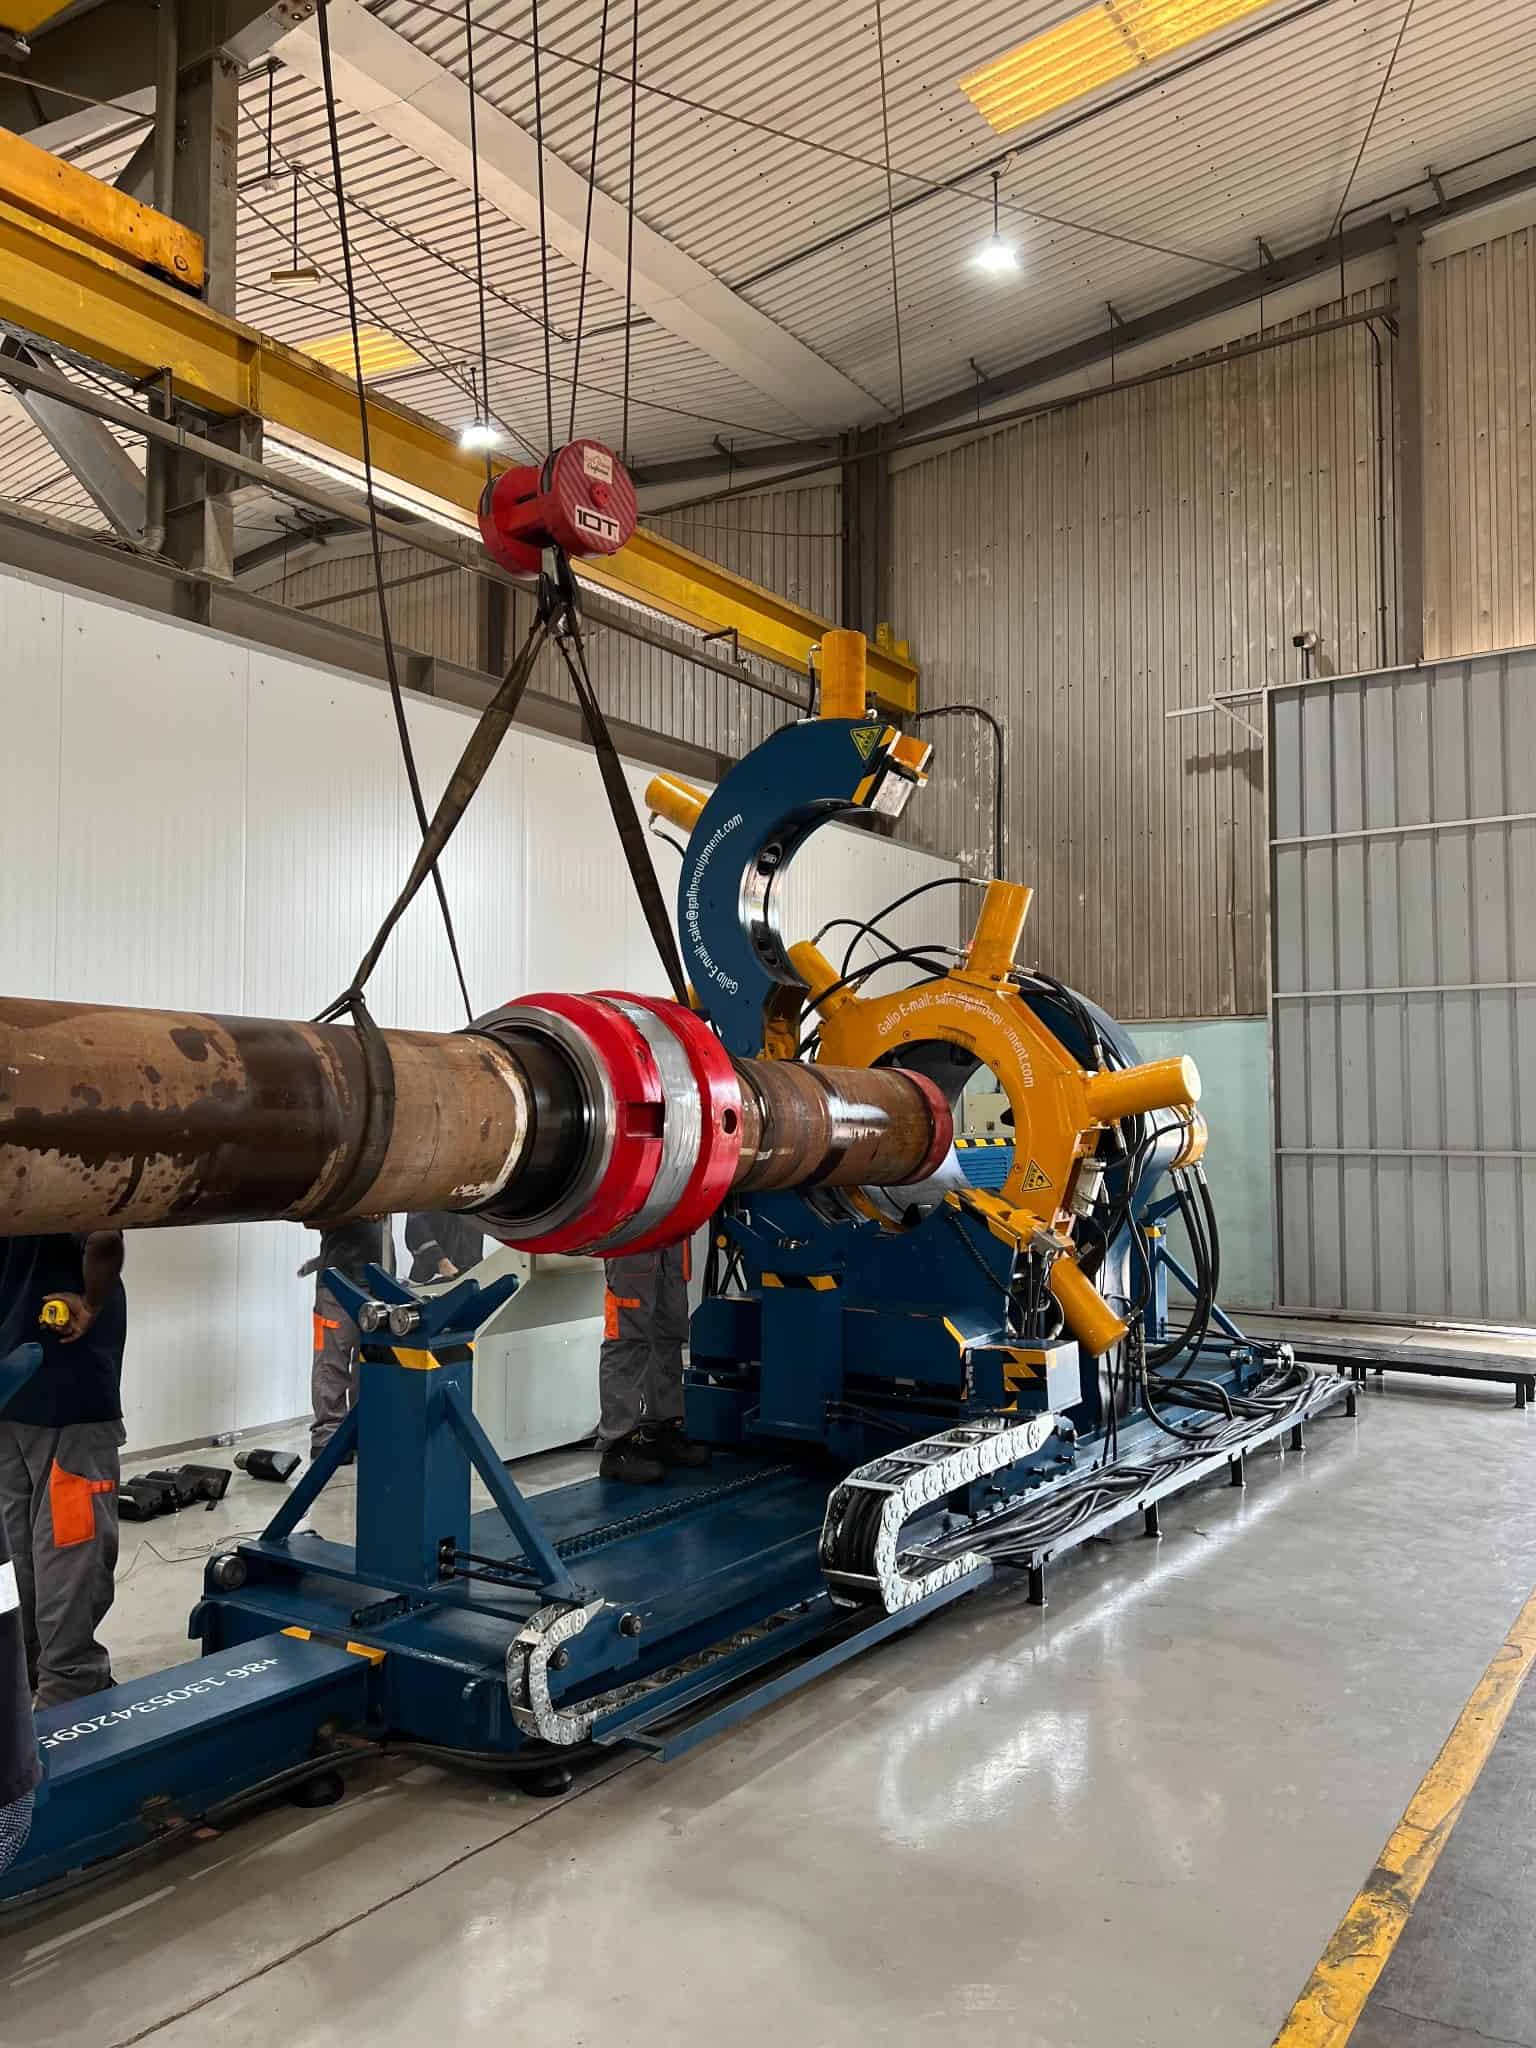
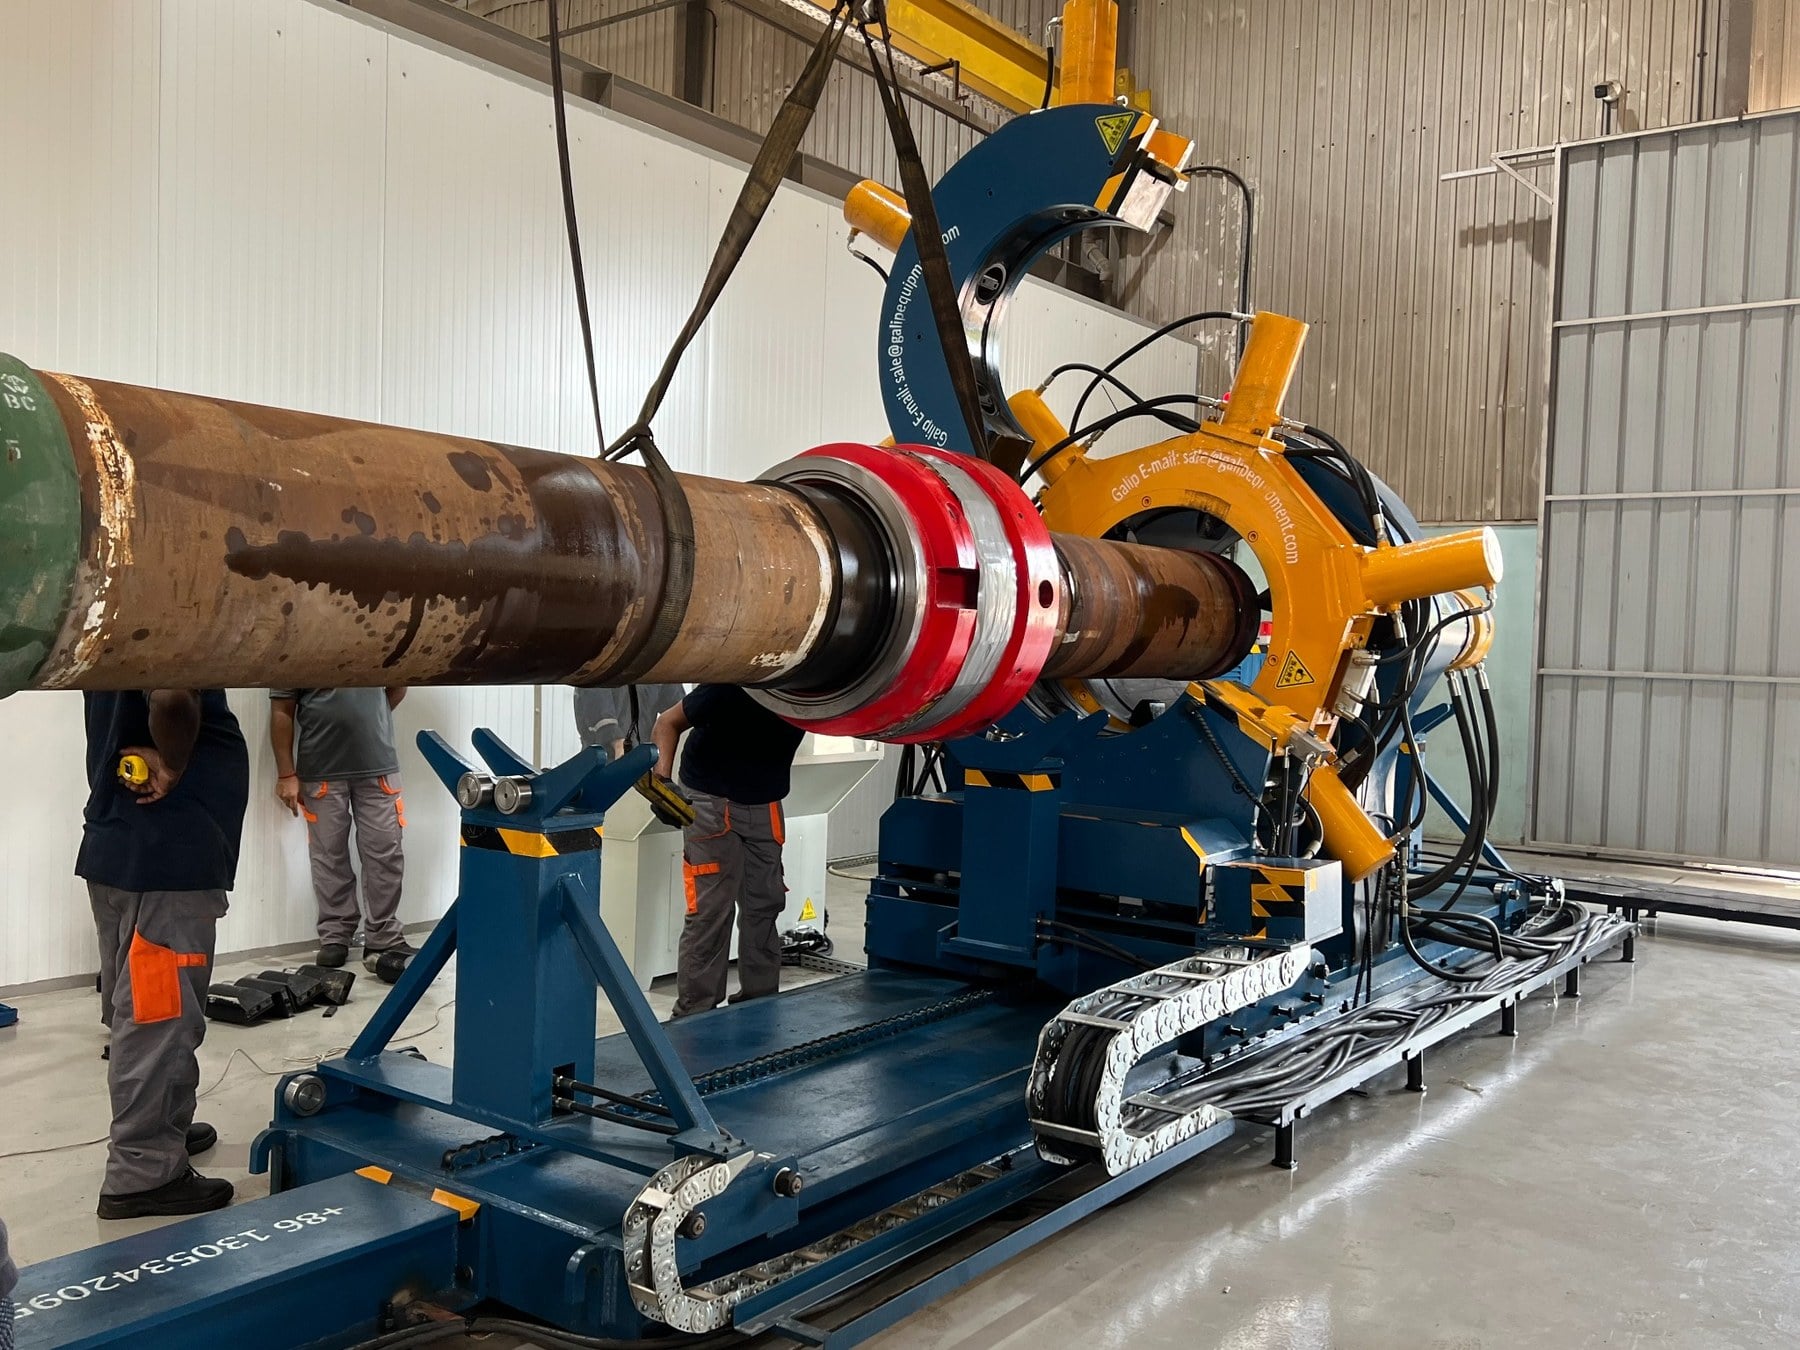
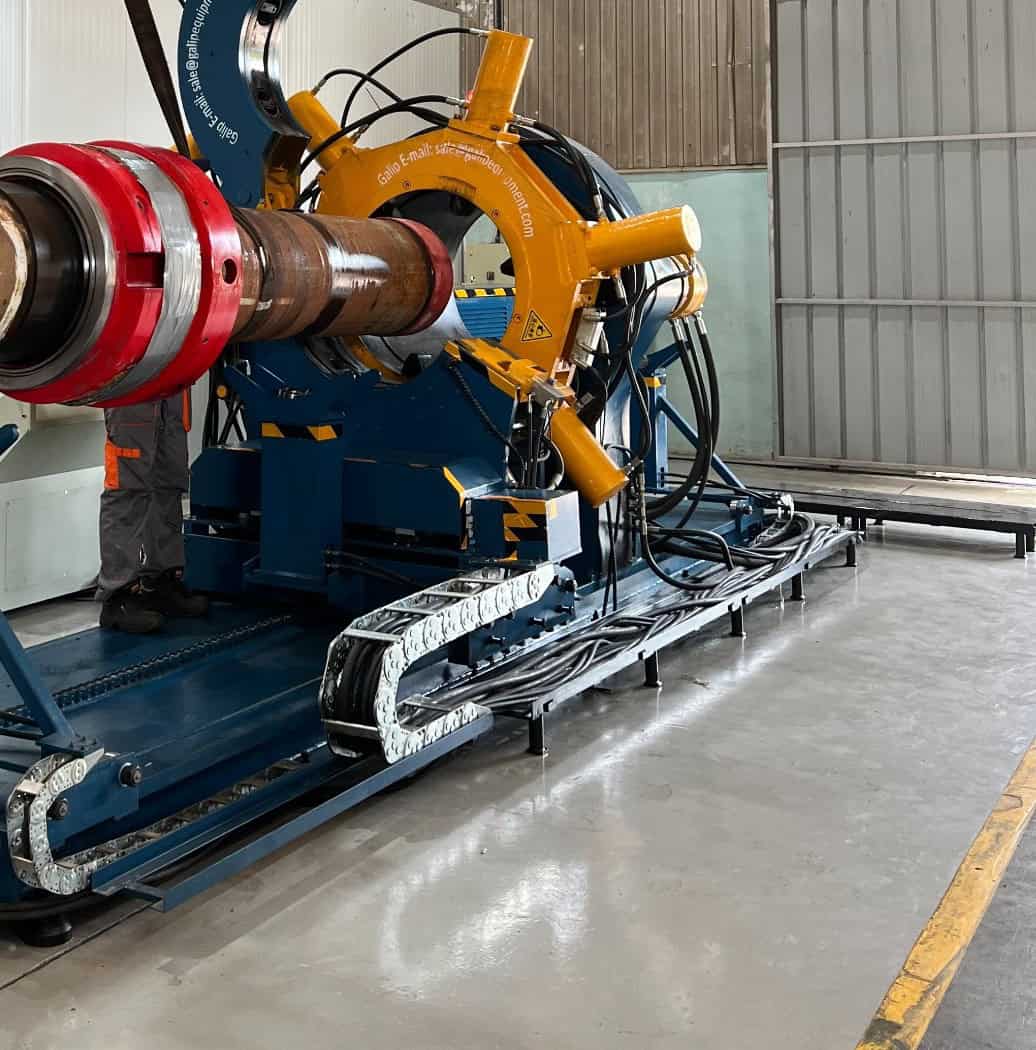
The photos in this article show a real Galip hydraulic bucking unit working with a long tubular, roller supports, a large rotational head, and an overhead crane. That is exactly the situation where good workshop habits matter. The crane is not only a lifting tool. It becomes part of the make-up cell because it decides how the pipe enters the support stands, how the shoulder approaches the head, and how much time the operator has to inspect the connection before clamping.
This guide is written for workshops that already own a bucking unit or are planning to buy one. It does not replace a certified lifting plan, local crane rules, connection-owner procedures, or site safety requirements. It gives a practical shop-floor checklist for pipe loading, support placement, operator communication, and record discipline before make-up begins.
Why Pipe Loading Deserves Its Own Procedure
Many teams write a make-up procedure but leave loading to habit. That is risky. Loading is the moment when the workpiece is moving, the crew is close to the machine, the sling is under load, and the connection is still vulnerable. A clean bucking unit pipe loading process reduces the chance of side load, thread contact, clamp misplacement, and unnecessary rework.
A bucking unit can control rotation, clamping, torque delivery, and reporting, but the unit cannot correct every problem created before the pipe is in position. If the pipe is resting unevenly, if the support stand is not carrying the weight properly, or if the connection is pushed into the head instead of guided into place, the operator may see a strange curve later and blame the wrong cause.
The best workshops treat pipe loading as part of quality control. The job does not start when the machine turns. It starts when the pipe enters the work area. That is why the loading checklist should sit beside the torque-turn procedure, not in a separate folder nobody opens.
What the Real Photos Show
The pictures show several details that are easy to overlook. The pipe is long and heavy enough that crane control and support placement matter. The red shoulder area is close to the machine, so the approach must be slow and straight. The support stands are carrying the pipe before full clamping. The operator and support crew are close enough to communicate, but they still need fixed positions and clear stop commands.
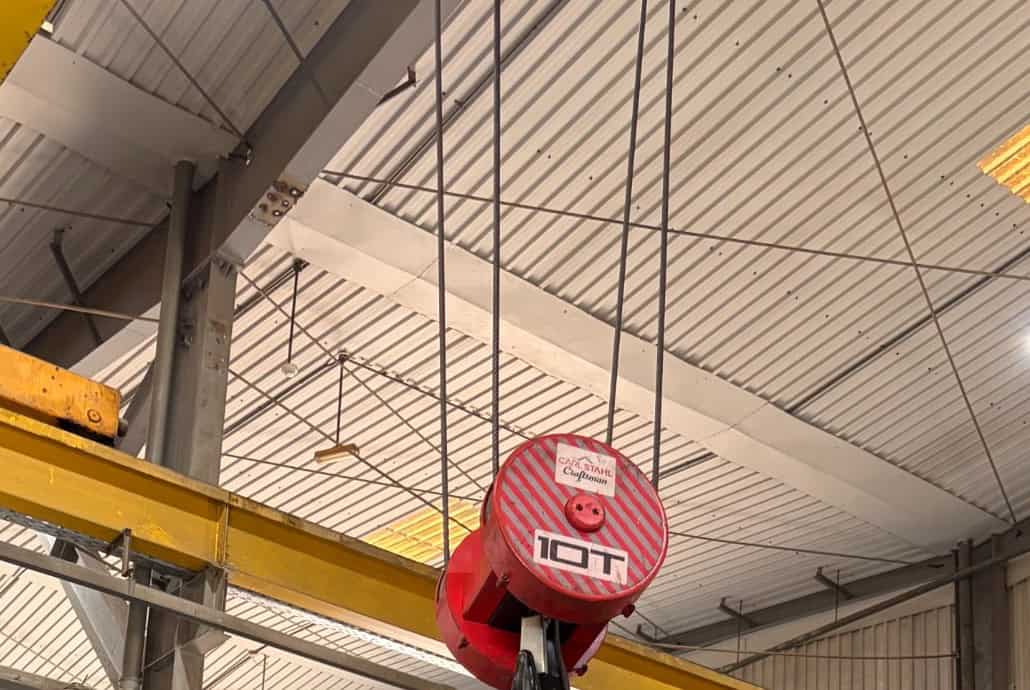
The overhead hook sits above the work cell, not far away from the unit. That reduces dragging and helps the crew lower the pipe into the support line instead of pushing it sideways across the machine. The workshop floor is also open enough that the operator can see the pipe, the support stands, the head area, and the cable path. These are small details, but they make repeated make-up work safer and more predictable.
For Galip buyers, these photos also show why a bucking unit quotation should not be based only on torque range and OD. The real question is how the machine will live in your workshop: where the crane comes from, where the pipe is staged, how support stands move, where the operator stands, and how the record is saved after each joint.
1. Start With the Crane Path, Not the Machine
Before the pipe is lifted, the crew should confirm the crane path. The path should be straight enough that the pipe can be lowered into the support line without dragging across guards, jaws, rail structures, hoses, cables, or floor obstacles. When the crane path is bad, operators often compensate with manual pushing. That is when hands, shoulders, threads, and machine components get exposed to unnecessary risk.
A practical rule is simple: the crane should bring the pipe to the bucking unit; the crew should not have to wrestle the pipe into the bucking unit. Tag lines, lifting accessories, and crew positions should be controlled by the site lifting plan. The operator should not be under the load, between the pipe and machine, or in a blind spot where the crane signal cannot be seen.
The crane path check should happen before every new job type, not only during installation. A different pipe length, OD, stabilizer, motor section, jar, or crossover can change the center of gravity and the amount of clearance needed around the machine.
2. Stage the Pipe Before It Reaches the Head
Good staging means the workpiece is already under control before it reaches the clamping area. The crew should know which end enters first, where the connection will stop, which surfaces must not be clamped, and which stands will carry the load while the crane slack is reduced.
If the pipe is staged too far away, the crane operator may need several small corrections while the connection is near the head. If the pipe is staged too close, the crew may rush the final approach because the load is already inside the work zone. Neither condition is ideal.
For bucking unit pipe loading, the staging area should also separate incoming, in-process, and completed work. Mixing these areas causes confusion. A pipe that has already been cleaned and inspected should not be placed where dirty incoming tools are being moved. A completed joint should not block the path for the next lift. Small routing mistakes become big production delays in high-volume work.
3. Let the Support Stands Carry the Job Before Clamping
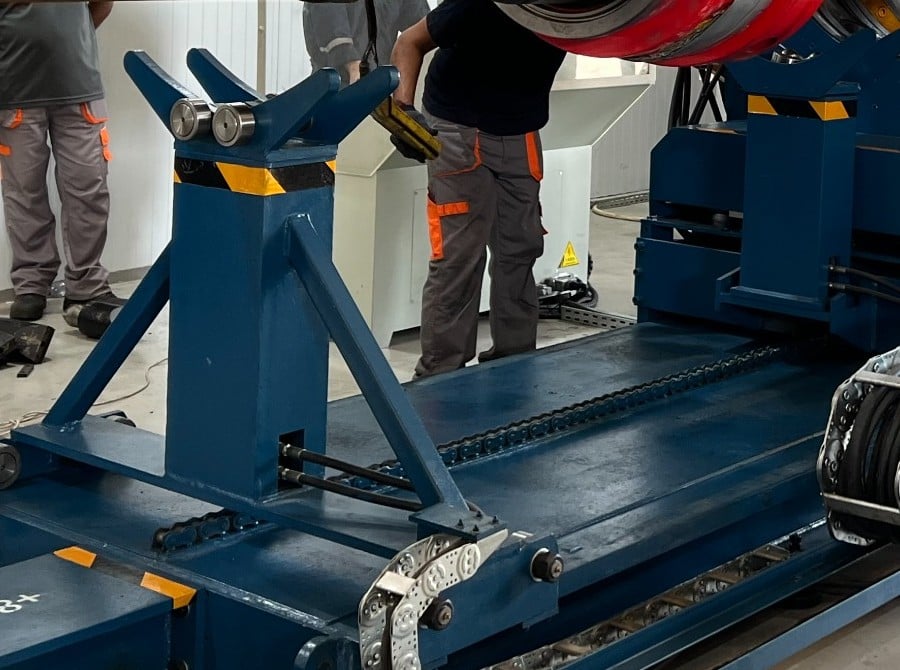
The support stand is not just a convenience. It is part of alignment control. Before the clamps close, the pipe should sit naturally on the support stands at the correct height and line. The crane can assist during positioning, but the load should not remain suspended in a way that hides poor support setup.
When the supports are too low, the pipe may sag near the head. When they are too high, the connection can be forced into the machine instead of approaching straight. When support spacing is wrong, the pipe can look acceptable at the head while the long body is still bending or trying to rotate.
A good operator should pause before clamping and ask three questions: Is the pipe sitting naturally? Is the shoulder or connection area free from contact damage? Would the pipe stay stable if the crane slack changed slightly? If the answer is no, the loading step is not finished yet.
4. Control Swing Before You Control Torque
Pipe swing is one of the most common loading problems because it feels temporary. The crew may think, “It will settle after we clamp.” But clamping a pipe that is still swinging or being pushed sideways creates hidden setup stress. The operator may start make-up with the connection under side load, and the torque-turn curve may later show behavior that was actually created during loading.
The better habit is to wait for the pipe to settle, reduce unnecessary swing, and make the final approach slowly. The operator should not use the bucking unit head as a guide rail. The connection should be guided into position by controlled lifting, support height, and crew communication, not by contact with the machine.
If the pipe continues to swing, stop the approach and reset. Do not rush because the crew is waiting. In workshop work, one damaged connection can cost more time than several careful loading pauses.
5. Keep the Shoulder Area Visible Until the Last Moment
The shoulder, seal area, and thread-adjacent surfaces need visibility during loading. If the crew blocks the view, the operator may miss contact, dirt, dope contamination, rust flakes, or a small impact before the connection enters the make-up position.
The photos show the pipe close to the rotational head with the shoulder area visible. That is the correct idea. The operator does not need a dramatic inspection at this moment; the operator needs a quick confirmation that the connection is approaching cleanly, that the support stand is not forcing an angle, and that no sling, strap, or hand tool is trapped where the pipe will move.
For premium or damage-sensitive connections, this visibility is even more important. The make-up record can prove torque and turn behavior, but it cannot erase a dent, scratch, or contaminated sealing surface created during loading.
6. Define Crew Positions Before the Lift
Every shop has experienced the same problem: too many people step toward the machine when the pipe is almost in place. One person wants to check the stand. One person wants to watch the shoulder. One person wants to guide the sling. Another person wants to talk to the operator. The result is noise, blocked visibility, and unclear responsibility.
For repeated bucking unit pipe loading, define the positions before the lift. One person gives crane signals. One person watches the support line. One person monitors the connection approach. One operator controls the machine or stays ready at the console. Anyone not assigned to the lift stays outside the active area.
This does not slow the job. It speeds up repeat work because nobody needs to ask who is in charge when the pipe is already moving. It also protects the operator from making decisions based on multiple voices at once.
7. Keep Hoses, Cables, and Floor Items Out of the Loading Path
A bucking unit work cell often has hydraulic hoses, cable carriers, control lines, foot pedals, support tools, dope containers, cleaning tools, and hand tools near the machine. Loading a long pipe through that area can pull, crush, drag, or hide these items if housekeeping is poor.
The loading path should be checked before each batch. Hoses should not sit where a stand wheel will roll. Cables should not cross the path where the crew walks while watching the pipe. Loose tools should not be placed on the machine base or support beam. The floor should be dry enough that a person guiding the lift does not slip while the load is moving.
This is one reason daily housekeeping and pipe loading belong together. Clean floors and organized lines are not cosmetic. They protect both the equipment and the loading step that comes before make-up.
8. Do a Dry Approach Before the First Production Joint
For a new product type, new OD, changed support arrangement, or newly installed unit, perform a dry approach before treating the first joint as production. A dry approach means the crew rehearses the movement into the support line, checks height, confirms the stop point, and verifies that the operator can see what matters.
The dry approach should reveal practical issues: the crane hook is not centered enough, the support stand needs a different position, the pipe blocks the operator view, the control console is too close to the active zone, or the connection stop point is not clear. These are cheap problems when found before clamping. They are expensive problems when discovered after a questionable make-up.
A dry approach is especially useful for customer-witness jobs. It shows the customer that the workshop controls the whole process, not only the final torque number.
9. Record Loading-Related Exceptions, Not Only Torque Events
Most shops save torque-turn reports, but many do not record what happened before make-up. That creates a blind spot. If the curve looks abnormal later, the supervisor may not know whether the root cause was thread preparation, compound, rotation behavior, clamping, or loading.
A simple loading note can prevent confusion. Examples include: “pipe re-staged due to sling position,” “support stand height adjusted before clamp,” “connection cleaned again after loading,” or “lift stopped due to swing and restarted.” These notes do not need to be long. They need to exist before memory disappears at shift change.
This is also helpful for buyers evaluating a new bucking unit. The machine may provide the make-up record, but the workshop should also define how operator notes, photos, inspection records, and job names are tied together in the job folder.
10. What Buyers Should Tell Galip Before Ordering
If you are planning a new bucking unit, send more than the target torque. Send the real pipe-handling picture. A better inquiry includes the longest workpiece, heaviest normal assembly, OD range, connection family, support stand needs, crane type, lifting direction, workshop floor length, door access, finished-work routing, and whether customer witness jobs are expected.
This information helps the manufacturer understand the work cell. A machine that looks correct on torque range may still be difficult to use if the pipe cannot be loaded cleanly, if the operator view is blocked, or if the shop cannot stage incoming and finished tools without crossing paths.
Galip’s public bucking unit page already asks buyers to share OD range, torque range, connection family, reporting needs, and workshop details before configuration. This pipe-loading article adds the practical handling side: how the pipe gets to the machine, how it rests before clamping, and how the crew works around it. See Galip hydraulic bucking unit configurations.
Bucking Unit Pipe Loading Checklist
Use this checklist before the first pipe of the day, after a size change, before a customer-witness job, or any time the crew changes. It is intentionally simple so operators can use it without slowing the shift.
| Check area | What good looks like |
|---|---|
| Crane path | Hook path is clear; lift approaches the machine without dragging the pipe sideways. |
| Support line | Support stands are positioned before the final approach, not adjusted in panic under the load. |
| Pipe stability | Pipe settles naturally before clamping; no visible swing or forced angle. |
| Connection visibility | Shoulder, seal, and thread-adjacent areas remain visible during final approach. |
| Crew positions | Signal person, support watcher, connection watcher, and machine operator are assigned. |
| Housekeeping | Hoses, cables, tools, and floor items are out of the loading path. |
| Stop points | Crew knows when to stop: swing, contact, blocked view, wrong height, wrong stop point. |
| Records | Any unusual loading event is noted before the make-up report is saved. |
Stop-Work Triggers During Pipe Loading
A good loading procedure includes clear stop points. The crew should not wait until the pipe touches the machine or the connection is already in the clamp area before making a stop decision.
| Trigger | Recommended action |
|---|---|
| Pipe keeps swinging near the head | Stop the approach, let the pipe settle, then restart slowly. |
| Support stand height looks wrong | Do not clamp yet; reset support height and check the natural line. |
| Shoulder area is hidden | Pause until the operator or assigned checker can see the approach area. |
| Sling or strap contacts sensitive area | Reposition the lifting arrangement according to the approved lifting plan. |
| Crew members give conflicting signals | Stop movement and return to one designated signal person. |
| Cable, hose, or tool is in the path | Clear the floor before moving the pipe further. |
FAQ: Bucking Unit Pipe Loading
Is bucking unit pipe loading part of the make-up procedure?
Yes. It should be treated as a controlled pre-make-up step because poor loading can create alignment, support, visibility, and handling problems before torque is applied.
Should the crane hold the pipe during make-up?
The lifting plan and equipment design should define how the pipe is supported. In general, the workpiece should be properly supported and stable before clamping and make-up, not left in a condition where crane tension hides poor stand setup.
What is the most common loading mistake?
Rushing the final approach while the pipe is still swinging or while the support stand height is not confirmed. That can create side load and poor connection approach before the operator starts the machine.
What should be photographed during critical jobs?
For customer-witness or high-value work, take photos of the loaded pipe, support arrangement, connection condition before make-up, and final report package. Do not photograph customer-confidential details unless approved.
Does this article replace crane or rigging rules?
No. It is a workshop planning and operating guide. Actual lifting must follow the site lifting plan, certified rigging practice, local rules, and the buyer’s safety system.
Request a Bucking Unit Configuration That Matches Your Real Workshop
If your workshop handles long tubulars, premium connections, BHA tools, mud motors, or repeated make-up jobs, send Galip your OD range, torque range, connection family, reporting needs, crane access, support stand requirements, and workshop layout. Galip can configure a hydraulic bucking unit around the way your shop actually loads, supports, makes up, and records each job.
A bucking unit is not only a torque machine. In a real workshop, it becomes part of a handling system: crane, support stands, operator positions, housekeeping, make-up control, and QA records. The better the loading step is controlled, the easier it is to protect safety, connection quality, and production rhythm.
Expert Consultation
Need more information on optimizing your equipment performance? Our engineering team is available for technical consultations.
Request a Quote
Tell us about your requirements and our engineering team will prepare a detailed proposal with specifications, pricing, and delivery timeline.
